Practical 03: HTML Forms
This week's practical activity explores some more features including those in HTML forms and intermediate CSS. We will attempt to create a HTML form utilizing these features (minus information retrieval, this'll be covered when we go through PHP).
Task
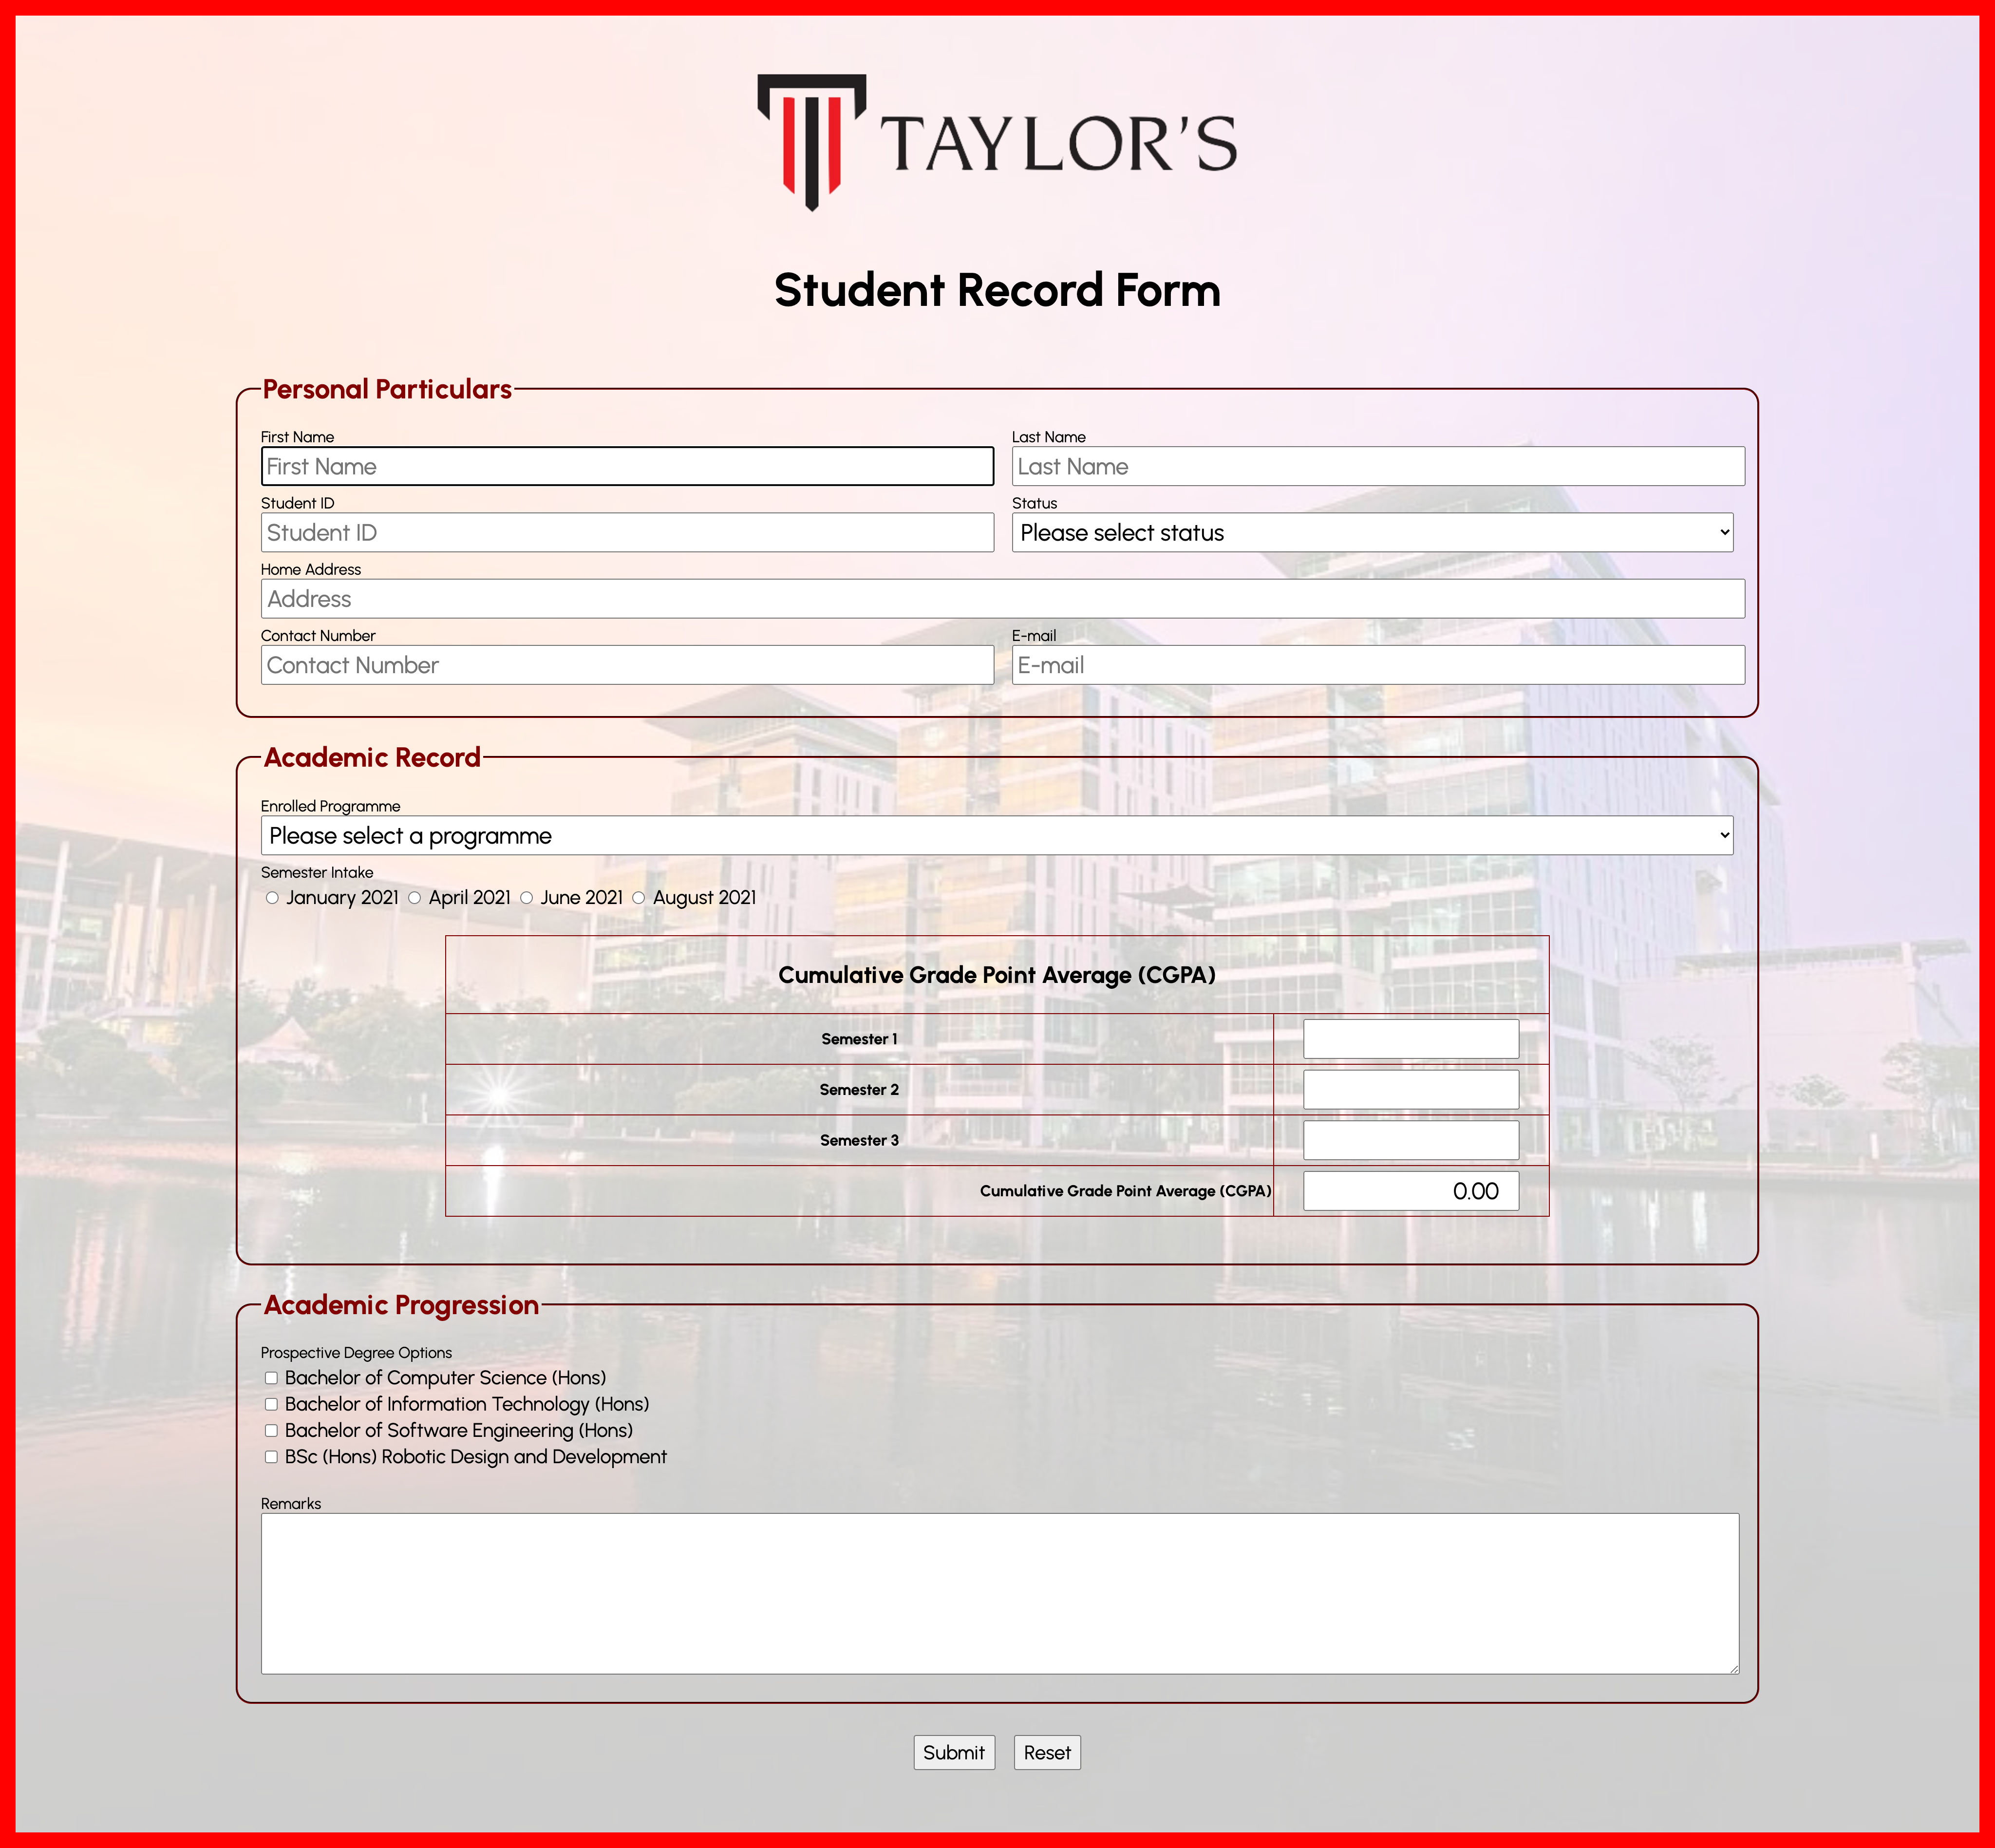
We will attempt to recreate a form resembling the one as shown below:
Note
Right-cick on the image and select "Open Image in New Tab" to have a clearer view of the image.
Image assets are given below:
The font used to create this form is called Urbanist, and it can be found in Google Fonts. Click HERE to open the Google Fonts page showcasing the font and to get details on incorporating it into your web form.
Some Extra Details
For Status under Personal Particulars, include the following in the drop-down list:
- Please select status (disabled, selected)
- Active
- Deferred
- Graduated
- Terminated
For Enrolled Program under Academic Record, include the following:
- Please select a program (disabled, selected)
- Foundation in Computing (FIC)
- Diploma in Information Technology (DIT)
Form Submission
Upon selecting the Submit button, redirect it to a different webpage called form-submitted.html.
In this page, create a webpage that essentially lets the website visitor know that the details entered into the form have been successfully collected.
Include any other element/text/etc. that can be considered relevant here.
Extra Task
Consider someone who may open your form on a mobile device such as a smartphone or tablet.
Web developers or designers make use of the following meta tag in the <head> section:
This will set the viewport of the webpage, which will give the browser instructions on how to control the page's dimensions and scaling.
Apart from that, media queries were used to cater for different screen sizes. Look up media queries online and try to incorporate it into your web form. You may use your browser's inspector tool to simulate viewing the webpage from a mobile device of your own choosing.
Some Guidelines
If you're stuck on where to begin, I can suggest focusing on placing the HTML elements first. Applying CSS can come in later once all HTML elements are placed or if and when you feel confident enough to start styling your webpage. Treat this as some scrap notes on what I think some students may struggle to find out on their own here; I'll see if I can update this as quickly as can be while the practical activity is still somewhat relevant.
The given form's body can be divided into three sections - Personal Particulars, Academic Record, and Academic Progression.
Personal Particulars
The way how this form was structured is by having some sections grouping together two smaller sections containing one form item each.
For instance, there'll be one section keeping two subsections containing the label and input field for First Name and Last Name respectively.
These two subsections' widths are set to roughly 50%, and both are separated using the CSS float property - one to the left and one to the right.
With CSS repsonsiveness, I've set the float properties to only take into effect based on whether the width of the browser is at least a certain given length - you can try and see which one fits you the most here.
Academic Record
The main thing that I feel should be highlighted is the default selection for the Enrolled Program <select> input.
In the given example, I have set the <option> element containing the "Please select a programme" text to not have a value attribute, but have disabled and selected instead.
disabledmakes it so that users are unable to select it from the dropdown<select>list.selectedmakes it so that the given option is selected during when the page is freshly loaded. Only use this on one<option>from the group of options in the<select>element.
Another thing I would like to highlight is to ensure that the name attribute for each radio button in this section (i.e., Semester Intakes) are the same.
Radio buttons should only have one selection per group, and keeping the name attribute value equal amongst these radio buttons facilitate this intended and correct behavior.
Academic Progression
Nothing in particular here, just that the <textarea> element is set to span the whole section's width by default.
Of course, it can still be resized as long as nothing extra is done to prevent the <textarea> field from being manipulated.
Submit and Reset Buttons
With <form> elements, you will require input:submit and input:reset instead of the typical <button> elements.
Manually using the <button> elements to redirect users to form-submitted.html or to simply refresh the page does not give the same intended functionality; this can be shown once we start implementing some form retrieval functionality in PHP later in the semester.
However, do be reminded that your <form> element containing these two input-specific buttons require both the action and method attributes.
Set the method attribute value preferably to POST, or GET is fine - this is of no consequence now, but will be touched once we get into PHP.
This attribute is not as important as action for the time being.
For your input:submit button to work as intended, you will need to set the value of your action attribute to form-submitted.html.
The action attribute allows sending information to an form handler file that can be responsible for entering data into the database, or other kinds of processing to perhaps facilitate a unique experience in a web application (i.e., different sets of data may display different outputs altogether).
A Little Advice on Styling
Right here, I want to provide a vacuum where you have some freedom to search up whatever CSS properties you feel you can leverage in creating this form. Feel free to play around with how it is, or you can proceed to the Video Guide to see how I've implemented the styles from scratch.
One thing you'll notice is that the given image's colors are a lot darker than what's shown in the sample.
What I've done here is to use the still unedited image as the webpage's background image, but have the <form> element to have a translucent white-colored background covering over the image to make it seem as if it is lighter to begin with.
This is one fix I've used without needing to doctor the image to make it appear just like that.
body {
    background-image: url("../images/taylors-bg.jpg");
    background-size: cover;
    background-position: center;
    background-repeat: no-repeat;
}

form {
    background-color: rgba(255, 255, 255, 0.8);
}
It is also helpful to keep in mind that there tends to be some predefined CSS stylings set - this includes margins on certain text elements like your heading and paragraph elements, and (particularly useful to know here) a hidden margin set in your webpage's <body> element.
If you would like to get rid of these margin, you can set it to 0 with CSS:
You can refer to the list of CSS Default Values here: CSS Default Values
Walkthrough
Video Guide
The following video will give a thorough walkthrough on how to develop the above form.
```